Vue Sharing / Vue 框架分享
Contents
1. Intro
Amazing compatibility. / 无限的融合和兼容
Upgrade => React Components
向上可以到达React 模式 React + Reflux => Vuejs + Vuex
Downgrade =>
向下可以到达 AngularJS 声明式 和 双向绑定
2. Dev Environment Establish / 开发环境搭建
- Install / 安装:
Download Node from https://nodejs.org/en/ and install.
下载 Node 并且安装。
npm install -g @vue/cli
vue create hello-world
npm run serve
let's have a look at what files have been generated / 看一下Vue 脚手架程序自动生成的目录:
./
├── README.md
├── babel.config.js (ES6 解析)
├── node_modules  (库)
├── package-lock.json
├── package.json  (依赖声明和脚本)
├── public   (静态库)
    ├── favicon.ico
    └── index.html
└── src  (代码)
    ├── App.vue  (默认App)
    ├── assets   (使用文件)
    │   └── logo.png
    ├── components (组件)
    │   └── HelloWorld.vue
    └── main.js (主入口)
3. Basic Components / 基础组件
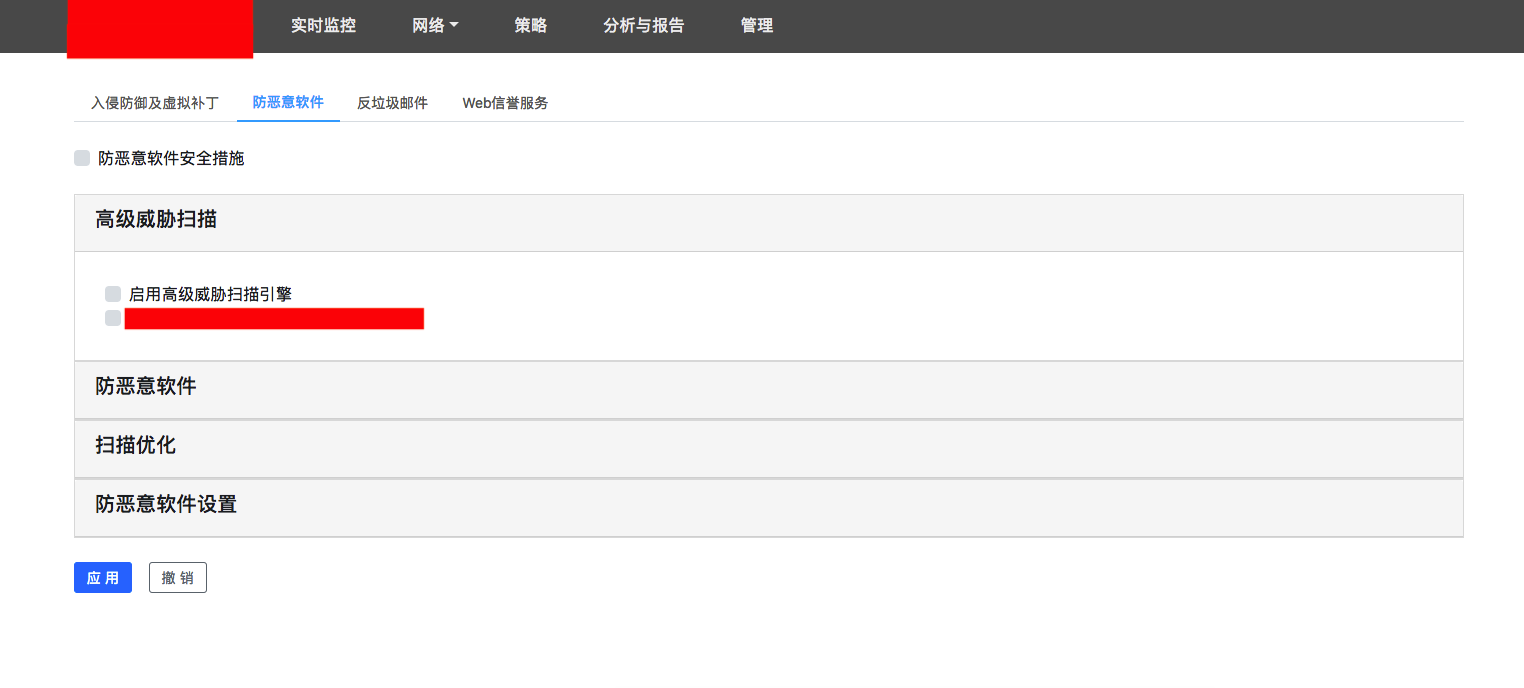
SubAV: Most code is copied from bootstrapVue. /大部分的代码拷贝自 bootstrapVue .
<template>
    <div>
    <b-form-checkbox id="checkbox1"
                        v-model="status"
                        value="true"
                        unchecked-value="false">
        防恶意软件安全措施
        </b-form-checkbox>
            <b-card>
            <h5 slot="header" v-b-toggle.collapse1>高级威胁扫描</h5>
            <b-collapse id="collapse1" visible>
            <b-form-checkbox id="checkbox2"
                        v-model="status2"
                        value="true"
                        unchecked-value="false">
                启用高级威胁扫描引擎
            </b-form-checkbox>
            <br />
            <b-form-checkbox id="checkbox3"
                        v-model="status3"
                        value="true"
                        unchecked-value="false">
                集成深度威胁发现设备 TDA 拒绝列表
            </b-form-checkbox>
            </b-collapse>
        </b-card>
        <b-card >
        <h5 slot="header" v-b-toggle.collapse2>防恶意软件</h5>
            <b-collapse id="collapse2">
            <p class="card-text">Header and footers using props.</p>
            </b-collapse>
        </b-card>
        <b-card >
            <h5 slot="header" v-b-toggle.collapse3>扫描优化</h5>
            <b-collapse id="collapse3">
            <p class="card-text">Header and footers using props.</p>
            </b-collapse>
        </b-card>
        <b-card>
            <h5 slot="header" v-b-toggle.collapse4>防恶意软件设置</h5>
            <b-collapse id="collapse4">
            <p class="card-text">Header and footers using props.</p>
            </b-collapse>
        </b-card>
    </div>
</template>

<script>
export default {
    name: 'SubAV',
    data () {
        return {
            status: 'false',
            status2: 'false',
            status3: 'false'
        }
    }
}
</script>
Use it / 组件定义好后可以被引用,就像一个模块一样:
<template>
    <div>
        <b-tabs>
        <b-tab title="入侵防御及虚拟补丁" active>
            <br>I'm the first fading tab
        </b-tab>
        <b-tab title="防恶意软件" >
            <br> <subAV></subAV>
        </b-tab>
        <b-tab title="反垃圾邮件" >
            <br>I'm the second tab content
        </b-tab>
        <b-tab title="Web信誉服务" >
            <br>I'm the second tab content
        </b-tab>
        </b-tabs>
    </div>
</template>

<script>
    import SubAV from './SubAV.vue'
    export default {
        name: 'ComponentSample',
        components: {
            'subAV': SubAV,
        }
    }
</script>

Add some CSS / 添加CSS :
4. Test / 测试
Install:
vue add @vue/unit-mocha
npm install moxios --save-dev
Component / 看一下组件代码:
<template>
    <div>
        RestSample
        <p>Following info are from remote:</p>
        <ul>
            <li v-for="(item, index) in items" :key="index">
                {{ item }}
            </li>
        </ul>
    </div>
</template>

<script>
    import axios from 'axios';
    export default {
        data(){
            return {
            items: []
            }
        },
        mounted: function(){
            const _that = this;
            axios.get('http://localhost:3001/rest/de_members')
            .then(function (response) {
                // handle success
                // console.log(response);
                _that.items = response.data;
            })
            .catch(function () {
                // handle error
                //console.log(error);
            })
        },
        methods:{

        },
        name: 'RestSample'
    }
</script>
Test / 看一下如何测试:
import Vue from 'vue'
import { expect } from 'chai'
import { shallowMount } from '@vue/test-utils'
import Dashboard from '@/components/Dashboard.vue'
import RestSample from '@/components/RestSample.vue'
import moxios from 'moxios'

describe('Dashboard.vue', () => {
    it('renders', () => {
        const msg = 'Dashboard'
        const wrapper = shallowMount(Dashboard)
        expect(wrapper.text()).to.include(msg)
    })
})

describe('RestSample Static', () => {
    it('has a mounted hook', () => {
        expect(typeof RestSample.mounted).to.eq('function')
    })
    it('sets the correct default data', () => {
        expect(typeof RestSample.data).to.eq('function')
        const defaultData = RestSample.data()
        expect(defaultData.items.length).to.eq(0)
    })
})

describe('RestSample Async', function () {
    beforeEach(function () {
        // import and pass your custom axios instance to this method
        moxios.install()
    })
    afterEach(function () {
        // import and pass your custom axios instance to this method
        moxios.uninstall()
    })
    it('Mounted Fetch, should fetch and render correctly', (done) => {
        const vm = new Vue(RestSample).$mount()
        Vue.nextTick(() => {
            moxios.wait(function () {
                let request = moxios.requests.mostRecent()
                request.respondWith({
                    status: 200,
                    response: [ "Fred" ,"Ben" ]
                }).then(function () {
                    expect(vm.items).to.eql([ "Fred" ,"Ben" ])
                    expect(vm.$el.textContent).to.include("Ben")
                    expect(vm.$el.textContent).to.include("Fred")
                    //expect(vm.$el.textContent).to.eq(2)
                    done()
                })
            })
        })
    })
});
Results / 结果:
WEBPACK  Compiled successfully in 3252ms
MOCHA  Testing...

Dashboard.vue
    ✓ renders (42ms)

RestSample Static
    ✓ has a mounted hook
    ✓ sets the correct default data

RestSample Async
    ✓ Mounted Fetch, should fetch and render correctly (323ms)

4 passing (453ms)

MOCHA  Tests completed successfully
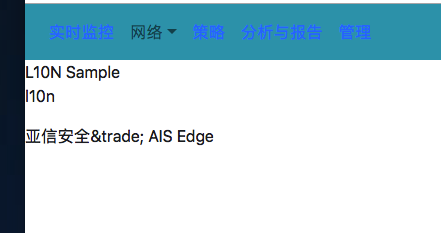
5. L10N / 本地化
Official Recommendation: Vue-i18n / Vue 因为是新生产物,基本上每一个都有官方的库。推荐 Vue-i18n .
- Install / 安装:
npm install vue-i18n
Load it and init it / 导入并且初始化:
import Vue from 'vue'
import App from './App.vue'
import router from "./router.js"
import 'bootstrap/dist/css/bootstrap.css'
import 'bootstrap-vue/dist/bootstrap-vue.css'
import VueI18n from 'vue-i18n'

Vue.use(VueI18n);

const messages = {
    en: require("./assets/l10n/l10n.en.json"),
    zh: require("./assets/l10n/l10n.zh.json")
}
const i18n = new VueI18n({
    locale: 'zh', // set locale
    messages, // set locale messages
})

new Vue({
    el: '#app',
    router,
    i18n,
    render: h => h(App)
})
Use it / 使用:
<template>
    <div>
        L10N Sample
        <p>l10n</p>
        <div>
        <p>{{ $t("common.PRODUCT_NAME") }}</p>
        </div>
    </div>
</template>

<script>
    export default {
        name: 'L10NSample'
    }
</script>
6. Router Conception and Router Implementation / 路由概念和实现
- Install / 安装
(https://bootstrap-vue.js.org/docs/components/navbar)
npm install vue-router
npm i bootstrap-vue   [For them 为了添加样式]
Now let's add some files to support router:
我们可以添加一些文件来支持路由:
src/
├── App.vue
├── assets
│   └── logo.png
├── components
│   ├── About.vue
│   ├── Dashboard.vue   (Add/添加)
│   ├── Home.vue   (Add/添加)
│   └── RestSample.vue  (Add/添加)
├── main.js
└── router.js  (Add/添加)
main.js : use App and Router / 加载App 和 路由
import Vue from 'vue'
import App from './App.vue'
import router from "./router.js"
import 'bootstrap/dist/css/bootstrap.css'
import 'bootstrap-vue/dist/bootstrap-vue.css'

new Vue({
    el: '#app',
    router,
    render: h => h(App)
})
App.vue : html (Most code is copied from BootstrapVue / 发部分的模板拷贝自 BootstrapVue)
<template>
    <div id="app">
        <b-navbar toggleable="md" variant="info">
        <b-navbar-toggle target="nav_collapse"></b-navbar-toggle>
        <b-collapse is-nav id="nav_collapse">
            <b-navbar-nav>
            <b-nav-item><router-link to="/dashboard">实时监控</router-link></b-nav-item>
            <b-nav-item-dropdown text="网络" left>
                <b-dropdown-item><router-link to="/rest">Sample Rest</router-link></b-dropdown-item>
                <b-dropdown-item><router-link to="/l10n">Sample L10N</router-link></b-dropdown-item>
                <b-dropdown-item><router-link to="/components">Sample Components</router-link></b-dropdown-item>
            </b-nav-item-dropdown>
            <b-nav-item><router-link to="/policy">策略</router-link></b-nav-item>
            <b-nav-item><router-link to="/report">分析与报告</router-link></b-nav-item>
            <b-nav-item><router-link to="/admin">管理</router-link></b-nav-item>
            </b-navbar-nav>
        </b-collapse>
        </b-navbar>
        <router-view></router-view>
    </div>
</template>

<script>
    export default {
    }
</script>
router.js : define routes / 定义路由
import Vue from "vue";
import VueRouter from "vue-router";
import BootstrapVue from 'bootstrap-vue';
import Dashboard from './components/Dashboard.vue';
import Home from './components/Home.vue';
import About from './components/About.vue';
import RestSample from './components/RestSample.vue';

Vue.use(VueRouter);
Vue.use(BootstrapVue);

const routes = [
    { path:"/dashboard", component: Dashboard },
    { path:"/home", component: Home },
    { path:"/rest", component: RestSample },
    { path: "/about", component: About}
];
var router =  new VueRouter({
    routes
})
export default router;
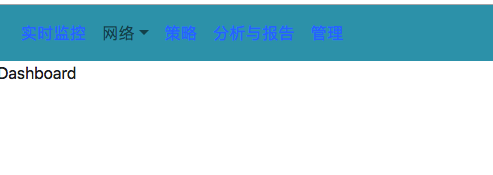
Dashboard.vue :
<template>
    <div>
        Dashboard
    </div>
</template>

<script>
    export default {
        name: 'Dashboard'
    }
</script>
Results: / 运行结果:
7. Debug And Deploy / 调试和部署
Debug / 调试
For Restful API, install
npm install axios.为了获取远端资源, 安装
npm install axios
Warning
"rules": {
    "comma-dangle": 0,
    "no-console": 0,
    "no-debugger": 0
},
Use remote side API and local UI / 使用远端API 和 本地 UI:
<template>
    <div>
        RestSample
        <p>Following info are from remote:</p>
        <ul>
        <li v-for="(item, index) in items" :key="index">
            {{ item }}
        </li>
        </ul>
    </div>
</template>

<script>
    import axios from 'axios';
    export default {
        data(){
            return {
                items: []
            }
        },
        mounted: function(){
            const _that = this;
            axios.get('http://localhost:3001/rest/de_members')
            .then(function (response) {
                // handle success
                console.log(response);
                debugger;
                _that.items = response.data;
            })
            .catch(function (error) {
                // handle error
                console.log(error);
            })
        },
        name: 'RestSample'
    }
</script>
- Deploy / 部署
npm run build
# npm install -g serve
serve -s dist

.. code-block:: bash

    ./dist/
    ├── css
    │   └── chunk-vendors.18ce9b24.css
    ├── favicon.ico
    ├── index.html
    └── js
        ├── app.2c52c92f.js
        ├── app.2c52c92f.js.map
        ├── chunk-vendors.9e2f9af0.js
        └── chunk-vendors.9e2f9af0.js.map

.. figure:: /images/web/vue_sharing_0002.png
Amazing easy! 是非常容易的, 因为直接可以测试变量.
Comments !